Woodworking Woes

Here's an email message I received:

From: Tracy

Subject: kitchen banquette

A comfortable custom kitchen banquette.

A comfortable custom kitchen banquette.

Message: My woodworker was supposed to make my kitchen banquette 17" high and it ended up being 18.5". Now with my 3" cushions, the seating comes in at 21.5". It looks attractive, but it's higher than I would have liked. I paid a decent buck for the custom banquette and cushions. What do you advise?

Tracy, there are multiple issues in this short email. 

First, does your woodworker acknowledge that there is a mistake? It's understandable that you did not measure it until he was done because, of course, you trust him. 

Second, I'm not sure that that 1 1/2" will make much of a difference. I mean, with these numbers, yes, the lower the better. But, I think it will still feel high. As a comparison, I normally (depending on the cushion) set the height of my banquettes somewhere between 14 and 15", usually around 14-14 1/2", anticipating a 4-5" thick cushion. For a 3" cushion, I'd probably size it somewhere around 15 1/2-16" high. 

Design a brightly colored fabric for your banquette.

Design a brightly colored fabric for your banquette.

Third, this matters if he is not acknowledging an error. Do you have documentation on how high the banquette was to be?

Fourth, if he does acknowledge that it was not accurately sized, and if you decided you wanted it lower than originally planned, ask him to make it lower. 

Fifth, are there any decorative panels on the face of the banquette?

Sixth, are there any other issues such as wallpaper or other moldings or the rear of the banquette if there is one, that is affected?

Those are my preliminary thoughts, knowing nothing more than what you've told me so far. I hope this works out for you. 

It's a rare client who will think to take a tape measure to woodwork that has been installed, nor is it their responsibility to do so. But, in a case like this, where the piece is finished, I do think Tracy deserves to get what she originally paid for, however it has to be worked out by the woodworker. What do you think?

Flooring Trends 2018

A visit I made to one of the premiere design exhibitions in the U.S., KBIS (Kitchen and Bath Industry Show) is an important venue at which to see major kitchen design elements (besides kitchen cabinetry and appliances) such as flooring. It's a great opportunity to experience complete looks and analyze kitchen design trends. Looking downward was very interesting and fun!

light and dark gray ceramic tile flooring

CONTRAST

is a trend

lights and darks used together was a major flooring trend

Gray flooring for 2018 remains a strong trend. And, it has pleasant tones! Grays with blue shades, lots of warm, muddy tones, even with barely perceptible touches of green in wood and ceramic flooring are prevalent. 

gray herringbone floor

It's interesting how gray flooring can look earthy. Maybe it's a concrete, textured connotation that comes across in some flooring. When gray and brown are mixed in wood flooring, it's an aged look, one that has an authentic element. 

light gray ceramic floor

The lighter shades of gray flooring feature a stylish look. Light gray floors also reflect a sort of soft Scandi and more modern style and you always experience an enhanced feeling of spaciousness with light colors. My own wood floors are painted white in my living room and I love the contrast of lights and darks in the room. 

medium gray ceramic tile

Medium tone gray ceramic tile appear soft and always hide a multitude of problems, spills and other unfortunate mishaps! Not too light, not too dark, the middle tones of any color is always the way to go to put off cleaning for another day or three. 

light gray kitchen flooring

Dreamy, flowy,


light grays

Grays can be SO stylish! When you talk about "a designer look", gray floors are a key piece to a room that appears different, unique and definitely has a cool factor. Gray as a foundation for a room's color palette allows one to use warm colors to exploit a warm/cool contrast theme, and, of course, it's a neutral that works with every color for maximum design flexibility.

light gray and brown wood flooring
wood herringbone flooring
light gray ceramic tile

Gray is elegance

soft, authentic, easy to coordinate with any color

These images reflect the latest trends in gray flooring for 2018. Don't forget, the kitchen floor is a critically important design element. You can select flooring first to drive all other colors and finishes or coordinate the color after you have chosen cabinet finishes but always consider surrounding rooms. One word of caution - gray has been a hot neutral for a few years and there is no telling how long the gray train will continue. If you love gray, my advice is to look for a flooring material that has some authenticity to it in texture and color. Best to have materials be trend-invisible!

Kitchen Backsplash Rail

What do you think of a backsplash rail? I've always liked them. When I first started in kitchen design in the late 80s, they were very common in European kitchen design - and still are. I would not call a backsplash rail a trend - it's really a classic way to store cooking equipment that is useful and intrinsically decorative too.

This is an image I shot at the Architectural Digest show at the fabulous La Cornue booth. I think it's a nice eclectic look - to have the, let's say, "less kitcheny" wood backsplash wall, which to me looks more formal juxtaposed with the useful items on the rails. 


The black and stainless add to the glam factor but the texture and tone on the wall is very understated and soothing. Of course, the pots are gorgeous with those brass handles!

Other options to add some warmth to backsplash rails are to add tea towels hung over the rail, place some herbs or flowers in utensil holders, put a small piece of artwork on a rail shelf or decorative crockery as a few ideas. The great thing about this kitchen design element is that it can change - just move useful items around the rail, add and subtract items, and create a whole new look for any reason or occasion. Change is good!

Following are other images of backsplash rails that I took while in Germany at the LivingKitchen fair. 

One of the best sources for a backsplash rail is the great collection of accessories and backsplash rail systems from Clever Storage

Would you use a backsplash rail in your kitchen?

Modern Kitchen Backsplash Accessories

Written By Kelly:

With the floorplan for my kitchen renovation decided upon in terms of work flow and lifestyle considerations, it was time to take a close look at an important functional aspect of the entire design - countertop prep space.

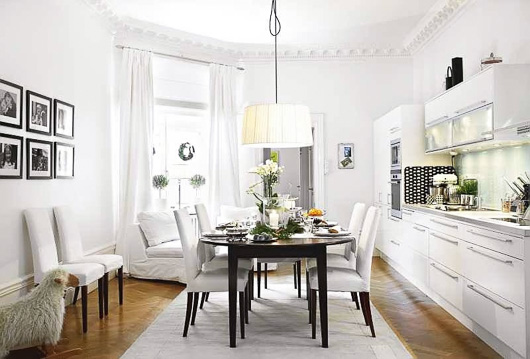
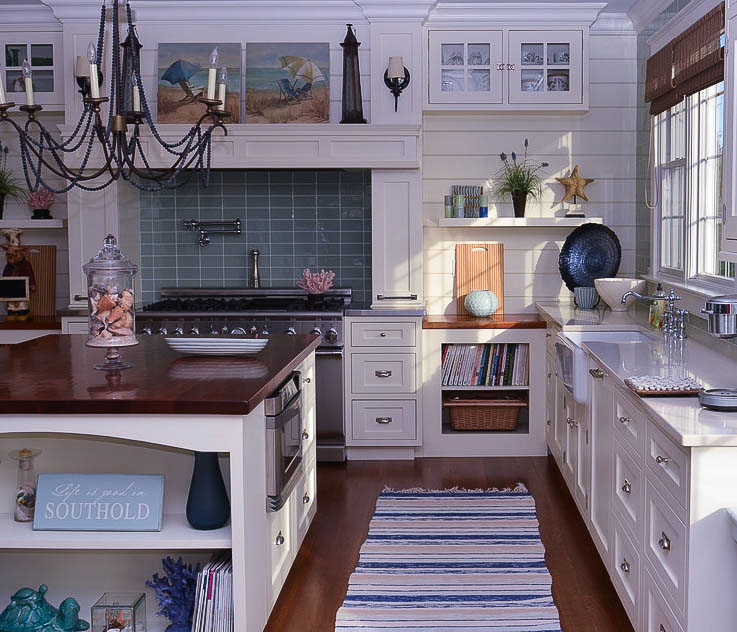
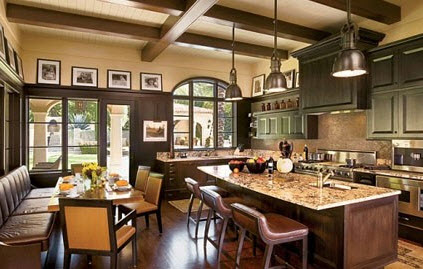
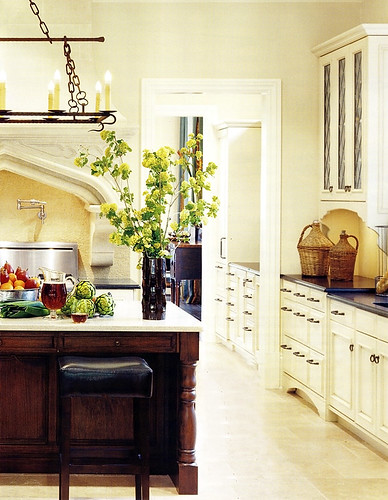
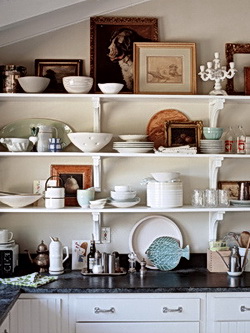
My old kitchen countertop with all the charming kitchen objects in place, allowing, maybe 9-10" of prep space front to back!

While, to me, my kitchen is a decent size having come from shoebox apartment kitchens in Manhattan, at 190 square feet, it is still small for suburbia. It was very important to both me and my mom/Susan/kitchen designer (all in one) to design in efficient countertop prep space; otherwise, really, what's the point? We immediately thought of Kessebohmer - a German brand we were familiar with that offers clever storage solutions as beautiful to look at as they are to use.

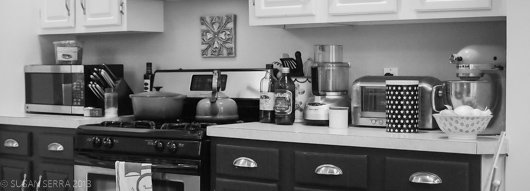
Since our main goal was freeing up counter space, I surveyed my counters in their current (read: cluttered) state and took stock of which elements would be most beneficial to our lifestyle and space and which could be moved off the counter. The Kessebohmer Linero collection became a quick answer to countertop clutter.

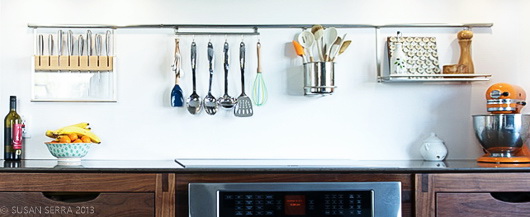
Linero is a classic modern rail system that is at once practical and extremely versatile. In fact, its beauty lies in its versatility. The simplistic design consists of a variable length horizontal rail that can be customized with any number of smart attachments.

As Kessebohmer's collection is so intuitive, we arrived upon more accessories than I had space along my backsplash where the main rail would be positioned. How to choose? We elected to get each accessory that I thought I would use under different lifestyle situations, and change them out as needed.

This concept has since evolved into many different, and FUN, iterations, and has given us a tremendous amount of flexibility - which is THE keyword for my kitchen. Here are the elements we chose, and how they've been incorporated into our multi-functional kitchen:

Spice Rack - This accessory houses my most-used spices, kept conveniently at arms length for when I need them, literally, in a pinch! Positioned at the far end of the rail, it is situated a safe distance from the heat of the cooktop so as to not spoil the spices.

Multi-Purpose Shelf - Simply one, clean, stainless shelf. I use this to hold a few frequently used oils, or a decorative plate and ceramic bowl.

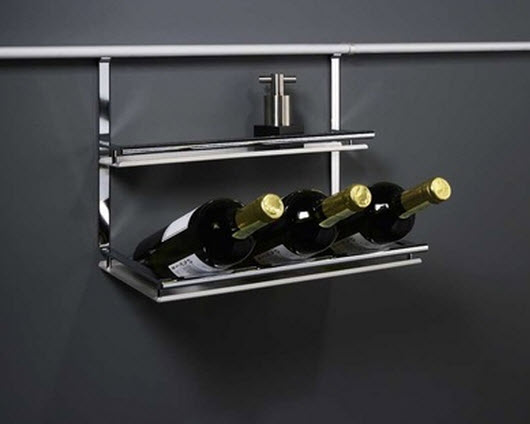
Wine Rack - Holds up to 3 wine bottles. We don't keep this up all the time, but trot it out when we're entertaining and want to take the kitchen from "cook's kitchen" to "Napa dining room" as it lends a very chic, festive feel to the unit.

Cookbook/iPad holder - Utilizing a second simple shelf on the rail for another use, I love this accessory purely for its functionality as previously noted. Having previously cracked my iPad screen with a falling spice jar (true story), this piece keeps your cookbook or ipad out of harm's reach. And, it's an excellent conversation piece as well - guests love it!

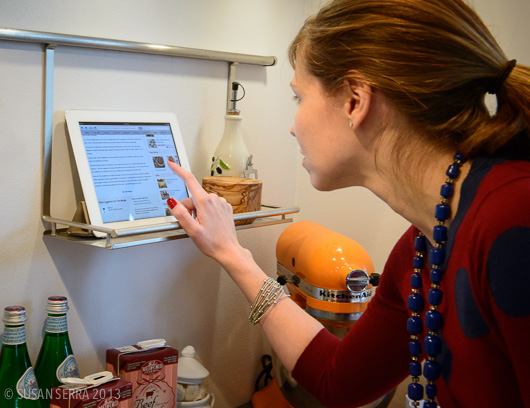
Kelly's using the ipad just before a dinner party

Single Utensil Jar - Raise your hand if your counters are currently housing the ubiquitous, cumbersome jar of utensils? Not mine! Previously the bane of my existence, my utensil jar is now conveniently suspended along my backsplash in close proximity to my cooktop for a quick grab of a wooden spoon or pasta ladle. More space to spread out the pizza dough on the countertop.

Knife block - It was, perhaps, most satisfying to rid our counters of the clunky, ill-shaped knife block that came with our knife set. This sleek element keeps knives safely shielded in a natural wood sheath, and behind a pane of glass. What I love most about this is the ability to quickly grab your exact intended knife, instead of playing a guessing game with knife handles.

Utensil Hooks - This is a beautifully simplistic row of 6 hooks intended for hanging utensils. Of course, I ran out and purchased a crisp, matching set of Chrome utensils with holes in the handles, but the collection has evolved into an eclectic hodge-podge of trinkets (such as my beloved Danish bottle opener) and novelty utensils from Anthropologie. And I quite like it that way.

Three-Cup Utensil Holder - This is another accessory that we don't keep out every day, but when we're expecting guests, I'll fill it with fresh flowers, or other decorative objects.

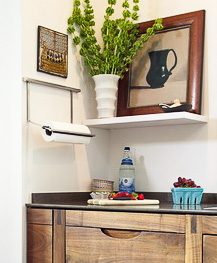
Paper-Towel Holder - My husband has an unearthly affinity for paper towels. This storage solution is much more favorable than an on-counter dispenser. We positioned it as the solo attachment on a short rail alongside the sink for quick, easy access.

One of the most valuable lessons I've learned from renovating my kitchen speaks to the benefits of having an open mind. Many elements that were designed and decided upon were based more on trusting my designer and a "sure, let's do it" attitude than an actual previously recorded need or desire. For example, I didn't truly know to what extent the Linero rail system would solve multiple cooking and lifestyle issues in the kitchen until it was installed, and as soon as I hung up those attachments, I knew there was no going back. The convenience and efficiency is remarkable, and the flexibility adds an exciting element of evolution and versatility to our kitchen.


Stay tuned for a later post where we show you a few different "outfits" for our Linero system. Linero does holidays, it does dinner parties, and most importantly, it puts the "fun" in function!


Thank you to partners: Kohler, Silestone, Bosch, Hafele, Kessebohmer, autokitchen and Kravet who donated products or services and who had the vision to know this renovation would use their products in interesting and creative ways!

Ten Tips To Create A Cozy Kitchen

The fireplace, just 6' from my desk, has a beautiful fire going, I'm looking out the window at snow falling, AND it is the beginning of a big snowstorm set to unfold over the next 24 hours! I'm fully prepared, in "hunkering down" mode and ready to enjoy my home, most especially, its open plan kitchen/den.

...Which makes me think about "the cozy kitchen" and how we can make the winter kitchen comfortable, cozy, and warm - a pretty delightful combination!

Image from Skona Hem

1. Rugs - Do you have an unheated tile floor? Bring in rugs with a rubber pad to hold it in place or use rug tape. Rugs "do' cozy, really well!

Rugs from ScandinavianMade.com

2. Warmth - Bring in the candles...gather small stones, twigs and pine cones from the outdoors and make a lovely arrangement on a plate.

3. Lighting - When buying pendants or lighting fixtures, hang them low! The lower they are hung, the cozier the feeling.

4. Long Cooking - Cook dishes that require low, long, simmers, roasting, braising, etc. Crockpot dishes cooking all day enable the savory fragrance to flow throughout the home. 

5. Start a Fire - Do you have a fireplace in your open plan kitchen? Start the fire in the morning and keep it going - the act of fire tending is a cozy activity. The act of flipping a switch for a gas fireplace gives instant atmosphere. Either way, it's all good!

6. Pantry Party - Stock your pantry with specialty condiments, which add a touch of something special to every day foods - truffle salt, artisan cheese, good coffees, small batch balsamic vinegar and oils are some examples. You deserve the treats, and it adds to a pleasurable cooking and dining experience.

7. Cushion Comfort - Do your seat cushions need replacing? Replace them with super cushy cushions to encourage post-meal lingering and relaxing.

8. Bring in the living room artwork - definitely, a mantra I have repeated many times. Oil paintings, sculptures, in other words, the good stuff, has a place in the kitchen.

9. Kids Cooking - Create a small spot in the kitchen for kids' cooking equipment-just for them! A cozy kitchen accommodates whoever is inspired to cook.

10. Change - Change your decorative layer, change the use of tableware and serveware, remove things and equipment that are not useful and periodically update the kitchen for function and aesthetics for a refreshed kitchen overall, always in tune with your current needs!

The snow is really coming down now - everything is white...time to get cozy!!


The Kitchen Countertop - Where To Put The Philips Saeco Espresso Maker!

Whether you are a domestic goddess, work at home or can't wait to get home after a long day at the office, I can report that, I for one, seek out a little treat here and there during the day. It's a reward. And, it's most likely going to be a short or a tall cup of good coffee - and could well be a quick shot of espresso.

Funny thing is - over the span of 25+ years, I never drank coffee. Maybe here and there in a restaurant, sure. Never every day. Since my husband retired from a work injury nearly 3 years ago, little by little I joined him for a cup of coffee. Now, I'm up to 2 cups a day, one of which may be a shot of espresso or a capuccino, one of our favorite food groups!

He or I would go out to get the afternoon shot of espresso, so when the nice people at Philips Saeco asked if I would be interested in reviewing the Philips Saeco Syntia espresso machine, I felt it was a natural fit into our lifestyle-and hopefully into the kitchen countertop, which I was quite curious about.

Owning your own personal espresso machine is an enhancement to your lifestyle, I can definitely say that. The Philips Saeco Syntia has rapid steam, a quiet grinder, an easy-clean system, large capacity 40-oz water tank and so many other cool and highly technological but easy to use features. It has an understated beautiful design and is quite compact. 

Which brings me to the larger issue of finding room on the countertop for an espresso maker. Here are some tips:

1. How often is the espresso maker used? If daily or several times per week, it deserves easy access. 

2. Consider a coffee station in the kitchen.  A spot where cups and mugs are stored, one or more coffee makers, utensils, other coffee accessories, teas and more. 

3. Mugs and cups - Begin a collection. Half the enjoyment of drinking coffee is to drink from a beautiful cup. Select the proper cup according to your mood! Display your cups too!

4. The coffee station can live in a kitchen armoire that looks like a piece of furniture, such as a breakfront, with retractable doors, serving as a gracious spot to easily prepare a favorite beverage.


5. Scan the countertops - In a small kitchen where space for a coffee station is often not available, check to make sure that over time the countertop has not adopted other small appliances or decorative objects that are not being used. Declutter, scan, rearrange, and chances are a spot can be found for the espresso maker.

5. The compact size of the Philips Saeco Syntia espresso maker can fit easily within the typical backsplash height, a critical issue when shopping for espresso makers if it will live on the countertop, but be sure to check your backsplash height before purchase.

6. Besides its size, is it a good looking piece of equipment? If small appliances are going to live on my countertop, I am fine with that, but it is also important that they have a look of quality. Is that true for you too? 

7. Simple lines without an abundance of dials, knobs and other projecting parts will add far less "visual clutter" and will appear more elegant and more visually quiet on the countertop.

8. Alternatively, the espresso maker can have a home just below the countertop in a cabinet with a roll out shelf, or on an upper open shelf, if use is somewhat less frequent.

I have experienced nothing annoying or bothersome about this machine at all and I love the glossy black finish. It's not immediately intuitive - you have to sit down and read the manual or the quick start guide (who doesn't love a quick start guide?) It has both text and simple pictures to get you going, which I appreciated and needed.

It's great to have lots of wonderful features in your espresso maker of choice, but first, take a look at how you can best integrate this new treasured appliance into your existing space. Check features, dimensions, style and you will find the perfect spot.

English Fancy–Royal Wedding Edition

Are you all recovering from your Royal Wedding revelry?  I didn't think I'd get caught up in the hoopla, but found myself stalling my toddler from heading to the playground so we could catch the tail end of the festivities.  I bribed her with promises of seeing "horsies" and princesses err...Duchesses of Cambridge (?!).  Now, onto festivities of our own, though no less majestic - Moodboard Monday Royal Wedding Edition!

Paying homage to the formality of traditional English Kitchens, we've kept things sophisticated in this week's installment with a subtle and classic color palate of white, nickel & blue.  For initial inspiration I've drawn from one of my all-time favorite images of a gorgeous kitchen designed by our very own Susan.  Though not technically located in England, the aesthetic is definitely reminiscent of a traditional, luxurious English farmhouse kitchen. 

Loving the striking look of this Falcon Range, with its rich heritage as one of the UK's leading manufacturers of professional range equipment.  Care to greet a life size portrait of the happy couple every time you reach for the milk?  Enter this GE fridge and get your royal fix in a prominent manner. 

Finally, what Royal roundup would be complete without a healthy dose of the great UK emporium, Liberty?  Cut up some crumpets on Carmen the Sheep. Host tea time with thisEmma Bridgewater dish ware set, and sew up a quick apron & tea towels with these gorgeous Liberty textiles

Cheerio!

Best, Kelly

The Secret To Life - The Pot Rack

I couldn't resist the title and the philosophical tone of this post. Here's an email from Rosemarie:

"I haven't been able to find this information on your blog, but I am new to it - any suggestions or taboos for hanging a pot rack in a semi open concept Kit, DR, LR area? I love the idea, and had a wrought iron rack custom made for my copper pots, but now I think maybe it will look cluttered."

I get to be the advisor on "the secret to life" so here goes:

BellacorSure, there may be some pros and cons as well as ideas and suggestions about the best way to display a pot rack in your situation, or if it even should be displayed. 

Better yet is to do this: Be flexible. In this case, we are not talking about a permanent fixture or design element that truly is a decision which you may have to live with for many years to come. I highly recommend that, especially since it is custom made, you hang it where you originally felt it should be. There is no right or wrong answer...the answer is do you perceive "clutter" as a negative or do you perceive it as visually interesting, a positive?

Live with it. If you find you don't like it, I would chalk it up to a minor error in judgment. The point is, don't think of this as a decision one way or the other forevermore. If it works out, great...if it doesn't, go to plan B.

So often decisions like these are looked at as permanent. Give yourself room to try it. 

Of course, if you were planning on having pendants or other lighting fixtures in place of the pot rack, then here's what I would do. I would have the wires run into the ceiling in the general area with enough slack so that they are in place if you decide you do not want the pot rack. A licensed electrician will advise you as to the proper code involved, I cannot do that, but most likely, you should be able to have wiring in place. Not the most inexpensive solution, but if you are indecisive on this issue, this may help.

Hubbardton ForgeThat said, some time could be spent on considering what types of items, decorative or functional, might look interesting visually. Maybe the pot rack serves a purpose to hold decorative items only. Take time...lots and lots of time to explore a wide variety of items which will result in some very different looks. 

I like to change decorative arrangements in my home on a fairly frequent basis, at least a few times a year. It takes time to create an arrangement that really "speaks" to me. Once it speaks to me, you know it...and then, take a photo of it and if you want to keep changing around the pieces, you'll have a record of an option that worked. This will take time, but be open creatively and the possibilities will reveal themselves to you. 

One more thing...if You are unsure, it's quite possible that part of you likes it up and another part does not. Keep it up for part of the year, then take it down. That is living flexibly and living flexibly is FREEDOM!


More Tips For Martha Stewart's Morning Living Sirius Radio Listeners!

As I write this post the day before, I can tell you that it will be my pleasure to speak to the listeners of the Morning Living show on Martha Stewart Living radio on Tuesday, March 16. See this before the 16th? Tune in tomorrow to hear my tips on pitfalls to avoid in the kitchen design process. 

Following is a further collection of my tips to hold disaster at bay as you plan your kitchen design!

1. Identify a trend: I think many of us are aware that trends are something that we see repeatedly in the marketplace. If that is the case, it is most likely that the trend could have a year attached to it down the road as the hot item of that year. When planning a kitchen, made to last for a couple of decades, take care in identifying trends. Planning several trends into your kitchen design will date the kitchen sooner than later!

2. When selecting paint colors for your kitchen, always buy small sample bottles of about 3 to 5 different shades. In my experience it is impossible to select a shade from a little paint chip. You'll need to paint at least 1'x1' squares on the wall to see how the paint samples look on your wall during different times of the day. Look for colored undertones. As color is best viewed in context, you will quickly see the color and shade effects.

3. One of my favorite tips...countertop samples. Often, we have these very small countertop samples which fit into the palm of our hands. The countertop characteristics are admired up close. Remember, that small samples that look to have seemingly medium to large size crystals, when viewed from a longer distance, will be remarkably different. It's all perspective. Look at the countertop up close and from varying distances to fully understand the grain distribution and pattern.

4. White cabinetry - It bears repeating, white painted cabinetry with small children under tow for years to come may not be the best combination. Speaking from experience, I can tell you that my white kitchen became considerably worn over time as a result of raising three children who ran into the kitchen directly from the garage door. Think twice about bright white for that reason.

5. Mix it up - Mixing metals can make your kitchen design feel more authentic, as opposed to perfectly matched metals. You will find metal finishes on appliances such as stainless steel, your sink, faucet, hardware and lighting. Chrome (an age old authentic metal, on a comeback) and oil rubbed bronze lighting? Go for it!

6. Collection proportion - Do you have favorite collections in the kitchen? Two pieces of advice here: change it up from time to time for a fresh new look, and watch the sizes. Very small pieces can look dwarfed when placed high above your line of vision and if it is also viewed from a surrounding room. Does a decorative piece seem to large to use? It probably isn't. Try it. 

7. Cooktop Venting - Do you need a vent? Yes! You want to remove odors, toxins, particulate material, smoke, and moisture. Allow for adequate power in the vent, and do not position your hood more than 36" above the cooktop for the best performance. I usually shoot for 32-34" above the cooktop so I am sure nearly all of the nasty fumes will be removed. 

8. A very helpful entertaining companion, the portable induction burner is just that...put it anywhere in the kitchen and you have yourself an extra burner for the holidays. It creates another work station for your assistant chef, and you will not have to juggle pots and pans all around the cooktop. It's a great solution!

9. A comfy suggestion - if a banquette is designed into your kitchen plan, do yourself and your guests a favor. Make the banquette short enough to allow for a super thick comfy cushion. Visualize various lifestyle situations...someone is lounging with a laptop or the newspaper, enjoying the cook's company, relaxing with a cup of tea...there is a lot to be said for a 4 to 5" cushion on top of your banquette as opposed to a thin 2" cushion. Do not underestimate the importance of comfort in the kitchen!

10. The best thing you can do for your kitchen design is to hire a competent and creative kitchen designer! He or she will guide you step by step throughout the design process to help you plan the kitchen you have dreamed about. When you do a kitchen once or twice in your life, it makes sense to seek out a specialist. 

Questions, or comments, please feel free to chat! Here is more of Martha's inspiration too!

Lance Armstrong's Kitchen - Get The Look!

A few weeks ago, Kathy Price-Robinson, a writer, knowledgeable on many and varied remodeling topics, asked me for comments on how to get the look, for less, of Lance Armstrong's kitchen.

I proceeded to write paragraphs (and paragraphs) on elements that I observed that one could replicate fairly easily. I'm thrilled to have been quoted in AOL for this feature, but, unfortunately, many of my paragraphs did not make the cut. There were some good points!

BUILT IN BANQUETTE

One could buy short stock refrigerator cabinets that are 24" in depth, mount the pieces on a platform of studs, put a sturdy top on top of them, and wa-laa you have storage and seating.  Those cabinets should be somewhere between 12-15" tall depending on the structure below and above the cabinets and the height desired for the bench. Take a look at this earlier post I did on banquette seating.

COUNTERTOPS

There are GORGEOUS laminate countertops now that truly look identical to granite or other stone except for the touch. They are worth a serious look. Alternatively, in one of my own kitchens, years ago, I used granite tile and wood trim which is an excellent second choice. I loved it. 

COLOR "BLOCKS"

As we see in the image, one of the elements that makes the most impact are the sophisticated colors and shades in Lance's kitchen. Paint your cabinets an elegant, smoky color such as the green in Lance's kitchen. 

Note how the window trim, the island, the cabinetry under the curved window and the bench are dark, muted colors. Rather than feeling cluttered, it flows - this is the essence of this look. It is a close relationship of color from one material/surface to another. I would not advise matching these colors one to another...subtle differences only add interest and sophistication. Be aware of undertones in the color and assemble the colors together so you can see the nuances of one to another, but do not worry about matching. 

There are 3 color stories in this kitchen..keeping it simple. We see the browns, the green, and the yellow/gold. The yellow-gold is seen in the chairs, countertop, tile and wall color. It adds a brightness, a "life" to the space as well as a unifying warmth.

To add to the feeling of "flow" the ceiling color continues from the wall color. 


BACKSPLASH

Observing even more continuity, note the simple backsplash which coordinates with the granite. One or two shades deeper and softer than the granite, it allows the granite countertops to take center stage without competing with it. Less IS more, especially in a large kitchen. Think of this kitchen as "layers" or blocks of color, proportion, contrast and texture to understand how these pieces fit together.

Electrolux and More...

Electrolux Kitchen Stories

I want to show you kitchen stories - 89 of them to be exact, courtesy of Electrolux, which is celebrating its 90th anniversary this year. SO...these 89 people with stories are all "kitchen stars", but Electrolux needs just one more to reach 90 - will that be you?

I'm crazy about this concept and find it absolutely fascinating looking at all these (real) kitchen stories from all over the world! You can be the 90th kitchen star! To enter, you must have an Electrolux appliance, even a small countertop or small vacuum appliance is ok. I don't love that requirement, but I DO love the kitchen stories! Enter or not, the kitchen stories are there to enjoy.

Susan's in the Houzz

I just started writing/editing ideabooks for Houzz on kitchen design. I certainly knew of Houzz but due to my busy world, did not focus on the site in depth until I was asked to take a look at it and to add my expertise on kitchen design as a regular ideabook (love that name) contributor. 

I think I may be addicted. I have no time to be addicted, and you may not either, but, the site:

  • is too user friendly as well as beautiful
  • is too much of a (truly) friendly, positive, community
  • has too large of a library of great interiors to ignore
  • allows you to hone in on exactly the style you're looking for
  • has great information
  • has ideabooks that are crazy/fun/beautiful/cool/etc.

to not immerse yourself. So, go ahead, you'll be glad you did, and don't blame me for your time lost! I do think it would only be fair for the universe to give us 2 more hours a day - life is very fast paced, more time is needed to take it all in! Here's my first ideabook... 


Here are a couple of recent posts I have written that I'd like to mention.

Small Appliances - Blog Post

This first post was written for my colleage, Kathy Barlow, of the Home Workshop blog. It's about how to deal with those migrating small appliances on our countertops. Take a look! 

Open Kitchen Floorplan - Blog Post

Another post for Decorati that I have not shared with you is an in depth look at the open kitchen floorplan - is it for you? It addresses potential issues, provides ideas for dealing with common problems and gives a fresh look at this emerging concept that many are feeling more and more comfortable with. As a realtor friend told me, "the ad that people respond to is the one that says 'open floorplan' in it." Of course, it's not for everyone, but I think it's a concept worth looking at at this moment.


Kitchen Odors On Soft Coverings - What To Do/How To Deal

Here's an interesting email that I just received this weekend:

Subject: Grass Cloth Wallpaper in the Kitchen
Message: Hello,

I'm toying with the idea of putting grass cloth wallpaper in my kitchen (but not behind any counter space or the stove) and was wondering your thoughts about this idea.  A kitchen designer we meet with suggested against it because it would retain smells from food prep.  This will be in my kitchen that is not heavily used...maybe one meal every other week.  Would you recommend grass cloth wallpaper in the kitchen?  People put fabric curtains up and sometimes have fabric covered furniture in the kitchen and would seem to be the same.

Thanks, Amanda

This is a great question, Amanda. As our kitchens become ever more integrated with surrounding living areas and/or decor, it's time to think about this question! I've been a strong advocate for some years of using soft fabrics, wall coverings that we love, as well as artwork, in the kitchen.

These decorative elements sometimes come with a "price to pay" for their inclusion in the kitchen. In my own kitchen, I have a sofa as well as good artwork, so I have lived with this issue.

Here's the answer you are NOT looking for, unfortunately. I cannot advise you specifically, as I am unaware of two things:

a. the proximity of the wallcovering to the main part of your kitchen. Even though you mention that it is not a backsplash treatment, it could well be surrounding your cabinetry, oven, and cooktop areas, and

b. whether you have adequate ventilation in the kitchen

In the end, it's really about the type of ventilation that you have in your kitchen. I'm referring to a hood or a downdraft (a poor cousin.) If your cooking ventilation is planned properly, cooking odors, fumes, and toxins are a minor issue at worst, but it depends on the proximity of the soft coverings to the cooktop or oven. "Prep" as you note, is a non issue. Cooking and moisture will affect the soft coverings. Cooking a meal once every other week makes this entire problem even more of a non issue, especially if you have adequate venting.

It IS important to understand that your fabrics in and around the kitchen, over time, may be somewhat affected by cooking odors, etc. Soft coverings in a kitchen, whether on the walls or on furniture, will also experience more wear than they would in other rooms...people leaning against or brushing against walls, frequent use of fabrics on chairs and pillows and increased general use of soft coverings.

Thinking flexibly about the durability of your soft coverings is the way to go. You may want to put "clean the fabrics" on your schedule for once a year. I happen to use and like Stanley Steemer but it's best to check with a professional fabric cleaner for more expensive fabrics and furnishings. Cleaning grasscloth is not easy or even recommended in most cases outside of using a vacuum for surface dust.

That said, you may need to reevaluate the overall durability of your grasscloth, say, 5 years down the road. Keep expectations for soft coverings flexible, again, as the durability will depend on use and ventilation issues. Small image from the book "Kitchens" by Chris Madden.

Pottery Barn Lighting

I just saw this new fixture from Pottery Barn. It is showcased in their newsletter that I received. At first glance I really didn't care for it. Too...something. Contrived? Uninspired? Too much like other lighting fixtures that incorporate common objects like silverware or glasses, etc. etc?

Twenty seconds later, I think I like it. While I don't think I'd buy it, it's the sculptural quality of it that's speaking to me now. I think I'm over my initial cynical thoughts. I do like the use of two fixtures over a table, although these should be set further apart. Could be great for a kitchen dining area/breakfast room too.

What do you think? 1) Like it or 2) hate it or 3) a New Yorker's "eh" (with a smirk and a right tilt of the head-stop, let's not forget the half closed eyes)?

7 Paths To Selecting Your Kitchen Cabinet Finish

"Hi Susan: A quick question if I may- with an open log cabin kitchen, wood floors, and a wood ceiling with beams, what color cabinets would you suggest? The wood is a light color on the walls and ceiling. Thank you, Patty"

Hi Patty (hand waving!)

First, I never see ONE answer to a question like this. Instead, I prefer to drive my clients crazy with six (or more) additional questions of my own to help them get focused! The method to my madness is as follows and represents off the top of my head questions as a response to this "quick" question.

  • The wood may be light, but how much light is there in the kitchen, either via windows or lighting? Could the room use help with reflected light from a large block of (light) cabinetry?
  • What are the colors/theme in the surrounding rooms? Is there any trend of wood finishes or colors that you will be seeing that you may want to blend or coordinate with, in the kitchen?
  • Do you like contrast or do you prefer colors to be soft and flow within the space?
  • If you are interested in, say, an opaque white, are you aware that, especially if children are in the picture, your cabinetry will look worn far more quickly than if you had other colors/finishes?
  • Are you going after a certain theme? Tailored, rustic, formal, modern, transitional, zen, other? That could give you a clue. Do you want to contrast the rustic framework of your log cabin with another theme to create an eclectic look? Perfectly acceptable. Note your other furnishings as a guide.
  • Could you be open to alternative colors that you normally do not see such as a soft khaki, an oyster grey, grey/blue, a light mushroom color, sort of a cool/warm soft contrast? Speaking of cool/warm, be aware of this color differentiation in the context of the overall color scheme as well as what's happening beyond the kitchen. 
  • You also may want to consider what finishes you want your countertops and appliances to be. These choices will also send a message about the total look of the kitchen. Likewise, the backsplash to a lesser extent.
  • What size is the room? Color/finish of cabinetry plays a role in space perception along with my first item to consider, above, lighting. I feel if the room is small but very well lit (very) perhaps with a light countertop and walls, then dark tones in the cabinetry are fine to use. Of course, a mix of light shades in a small room will allow the space to flow and not appear choppy/busy, something to seriously consider in a small space (choppy/busy).

So, unfortunately, I have no answer for you, only additional questions which should definitely put you on the path to focus and insight! Only you know these answers and it should take a little time to consider the various issues involved in selecting just ONE finish. No pressure or anything! I just can't make the decision for you.


Kitchen Flooring II - Still Light Colored

I've been meaning to show you this picture of another light floor. I simply love the feel of the light floor and the light cabinetry.

I like the horizontal dark element of the counters and I like the "important" or strong, feeling of the island in wood. 

The island, to my eye, does not overpower the other light colored elements. The reason it looks balanced to me is that there is so much MORE light colored elements in the room, balanced with just a few areas of the dark color. In other words, it makes sense proportionately in regard to color and tone balance. 

I also think this image goes a long way toward being serene, don't you? It has great interest, yet it is easy on the eyes and looks very spacious. The light floor, walls, and cabinetry, and understated backsplash, go a long way to achieve this quiet elegance. 

The floor...I think this type of floor, being quite textured, is fine in terms of being "busy enough" so you don't see every crumb immediately (unless you bake a lot of brownies.) The recent popularity of super dark wood floors is no better for spots, dings, dust, and so on. The best floor is a medium tone. But, to me, something REALLY speaks to me about a light floor. And, yes, for me, it would have to be textured. I'll have one, one day, in some form. This floor is limestone by Walker Zanger. Yes, limestone needs sealing and nervous care. I'm usually a conservative type, so I do not recommend it.

As seen in the June issue of Veranda.

What do you think of this combination of tones?


Top Ten Secret Kitchen Design Tips - Lighting!

DSCF4158a.jpgDo you think lighting is boring? Do NOT touch that mouse...I promise to totally excite you with these tips, ideas, and whatever, about lighting your kitchen. Here we go... (come on, get ready, settle down!) These are quick, useful, and un-boring ideas, like take-out from the gourmet food store. Maybe not ALL you need to know, but close!

1. Let's talk style! Lighting is jewelry, end of story. Think of it as such. It says something, a big something. Whatever you want it to say, it says it, and says it loudly. Do you want to pick something safe? It will say safe. Do you want style that's "out there"? That's your message. What's the point? Take your fixtures' design SERIOUSLY please...put TIME into choosing your lighting jewelry.

2. Pendants - hang 'em LOW! Low is cozy. Low is dining table-like. Low is cool. If your mother tells you they are too low, you know they're close to perfect, and maybe a little bit lower will do. If your contractor says they're too low, lower them two feet! (I'm joking, no cards and letters please.) :)

And, no, you need not worry as much as you think you need to worry, about the fixtures bumping your head. See? I knew you were thinking that!


Trend-5.jpg3. Pendants - hang 'em HIGH! Some pendants look okay hung high, and they would be wider/bigger/fatter fixtures, please, not the small ones hung high. Please! They will look lost, or worse, insignificant. I can think of lots more adjectives of an unfortunately negative nature for small pendants hung high!


thumb.aspxa.jpg

4. Pendants - hang 'em close together! They do not have to be hung 3' apart (yawn) over the island. Put a few close together, especially on a smaller island.  Where you'd normally put 2, put 3 closer together.

5. Does the island have a seating area? Put two different types of fixtures on the island...pendants on the work part, a larger fixture to feature the seated part.

6. Mix your metals, finishes, colors...do it with care, I don't want the lighting police banging on your door, but get creative with complementary styles and color.


DSCF4181a.jpg7. Don't forget the dimmers!

8. Recessed lighting - Save the planet and use CFL (flourescent fixtures)

9. Recessed Lighting - There are two schools of thought...the recessed lighting plan is either a) equally spaced in a logical grid type pattern (watch the swiss cheese effect-too many lights) or b) positioned over certain elements without a strict grid pattern. Give thought to which you prefer, keeping in mind if a light is off center close to a featured cabinet, it could look like a mistake. Take care in your planning. Me, I usually look to see what features are important in the kitchen, and sometimes use a particular feature as a starting point and then move off from that, like the hood, for example. Then, of course, get ready to do it all over again once the electrician says, "lady, there's a beam in the way!"

10. Under cabinet (not under counter as it is typically called) lighting - LED lighting is PERFECT for this application. Look it up, and again, save the planet. It is crazily energy efficient!

Bonus #11 - Trusty Wendy, from the comments section reminded me about sconces! Yes, sconces are very wonderful in the kitchen. I have two kitchens at the moment where I brought sconces into the design from the beginning, and an interior designer on the project said "Sconces? I like it!" They are flanking the window in each case, but don't stop there... 

There, wasn't that fun? I had a great time! 

normcopenhagen12_medium.jpg 

Kitchen Details That Might Bore You To Tears

I've talked about this before. The period of time just before an order is submitted to the factory. It's the time with the most pressure, as once released to the factory, that's it forevermore. The right and left sides of the brain collide but must work together...or else. End of story.

Here's an entry for a kitchen order I'm doing that is going to the factory today, and which is the culmination of months of creative thought and engineering on my part, and later, includes even more detailed collaboration with a designated person at the factory. This entry reflects an effort to provide a chef in a small residential kitchen the absolute maximum in storage and ease of use. This is one cabinet, and I've had two highly detailed kitchen orders I've had to make 100% perfect before I go away...oh, did I slip and say "go away?" I must be referring to the TOP SECRET project! But, I digress...

This level of detail and, really, engineering, when working with custom cabinetry, doesn't make kitchen designers good people or have the ability to create world peace. But, I include this to illustrate the interesting result of both sides of the brain working together. The next time you see your kitchen designer dressed fabulously, and laughing about something or other, remember, he/she may also be delving into the dark side of detail behind the scenes, unbeknownst to most.

I'll also share with you that, again, this particular cabinet happens to reflect a good deal of risk on my part, to absolutely maximize storage for this home chef (but a real chef.) His kitchen is an orchestra pit and he's the conductor. Does that make any sense at all? I can predict what will happen is that I will watch with utter excitement as this cabinet is put into place and the adjacent cabinets and appliances are put into place and i will stand there and AUDIBLY marvel at the symphony of all these fractions of inches working together, each fraction of which I chose.

I tend to get very excited, when I design a risky, expensive (thousands $$$) piece of custom cabinetry, and people around me tend to shrug and look at me strangely when I say "YES!!!!" (IT FITS.) It's really true. That's ok, I can celebrate by myself. :) In the meantime, however, my fingers are CROSSED.  But, if you're the client reading this, don't worry...I can't remember the last time a cabinet didn't fit. Really.


Here's the entry for one cabinet:


Base
106 1/4" wide x 34 1/2" high x 24.0" deep - YES, THE CABINET IS 106 2/4" WIDE
Front frame extended down .5" for scribe to be 35" high OA - TO SCRIBE NEATLY TO THE FLOOR
Hold both partitions short 10" from top of cabinet - FOR THE SINK
Left and right dust top recessed .5" from top of cabinet
Do not extend dust top past sink apron - DUE TO SINK
Blind base 43.500" wide - left
Combined cabinet charge
17.063" wide opening left - THIS WAS PLANNED TO THE 1/16" OF AN INCH
Omit drawer above
Full height door opening
False panel and door attached together with center rail to open as one - LOOKS LIKE A DOOR/DRAWER
5" backer
Omit shelf and shelf drillings
Install LeMans Corner System Hafele 541.33.445 - A VERY COOL CORNER  CABINET SOLUTION
Right swing
Full height sink base 19.500" wide-center
Combined cabinet charge
Split doors - NON SPLIT DOORS WOULD BE A NIGHTMARE
Aprom to hide sink - NICE TOUCH
8.5" high x 26" wide
1" radiused corners at bottom L&R
Apron will extend into far left and right openings 2.5"
See sketch
Blind Corner Susan 43.250" wide - right
Combined cabinet charge
16.688 wide openings left - PLANNED TO THE 1/16" OF AN INCH
Hold drawer box short an extra 2.5" from left - SO THERE IS ROOM FOR THE SINK
2 ea. 14" BCS Swingouts left
Blocking extends into opening 0.688"
Flush toekick
Special valance cutout - per sketch
1-Arch valance - 3 bottom rail - NICE LOOK, CURVED "VALANCE" AT BOTTOM
4" high
2" high at narrowest point
Held up 2" from bottom  

There's four more lines, but I think this is enough.  


Kitchen Shelving Trend and Iron Brackets

iron%20bracket.jpgNow that kitchen shelving is getting more popular, I also seem to be doing more of it! It adds such warmth and personality to spaces. It is a great look to mix both decorative AND useful items on shelving, that's really the beauty of it. Books, and salt/pepper shakers. Dishes and antique bowls. Vases and oil/vinegar botlles. Of course, closed baskets also look great on shelves, adding texture, but not dust!

I've lived with open shelving for my dishes and glasses now for a few years, and I have to say we love it. The dishes and glasses are used so frequently that there isn't time to accummulate dust. Some glasses which are less used, we'll do a quick rinse under the nearby faucet, and that's it. Open shelving is not for everyone, granted.

kitchen%20shelving.jpgI just ordered 14 brackets for a project. The place I mostly go to is Iron Accents. It's a Yahoo store, a very reliable company, and I've used them for years, I can definitely vouch for their product and quality.  

They also have a million different finishes, including colors! Some items are traditional in style, some are modern, and many are inspired by nature. If you use your imagination, you'll see how adaptable they are to many different design themes.

For the project I just purchased these brackets for, I wanted something very simple, especially having 14 of them. Simple, yet interesting, with a hand made sort of look. For me, it's a great go-to source.

Beautiful shelving image found in the beautiful collections of Desire To Inspire! 


Kitchen Artwork - You're The Arteeest!

I went to a serious, very serious (no smile is on my face) art gallery in New York City over last weekend. As I walked around, a thought occurred to me..."I can do this too!" As I walked and gazed (seriously) at the images before me, I knew I had to talk to you, my readers, about this thought.

I took 8 of MY images below and added 3 of the images that were in this gallery show that I attended.

I'd like you to tell me which images, below, you think were done by the artist in the show. That's all. Maybe mine are so bad this will be a simple task, and everyone will guess correctly! Oh, the embarrassment!

What's the point here?

The point, is that you have talent, perhaps unused talent, too. If these images can hang in this prestigious gallery, sometimes two or three next to each other with no space in between the white, simple, frames, a nice look, then you can enlarge your images too (or go out and take some) and hang them in your kitchen and look at them as art (which they are! You don't need to spend bundles on what you perceive to be "real" art. Find the artist inside you, hang your work in your kitchen, be proud of it, and you will feel something special. It's fun and rewarding, and relatively low in cost. 8x10s at mpix are $1.99. The matting and framing can be artfully done as well.

Those who know me know that I am a big proponent of putting art in the kitchen. Whether it is photographs, artfully framed and arranged, or oil paintings purchased from an artist, or other art forms, makes no difference.  I love to see space for art in the kitchen, and this is one way to do it, with meaning, AND, low cost.

OK, so which ones are the artist's images? Put the mouse over each image and its name will pop up at the top left of the small thumbnails.


Blogging Kitchen Blogs

Let's see who's talking about what in the kitchen focused blogosphere...

K+BB Green's Jeff Holloway, CKD, who blogs on green kitchen and bath products, issues, and ideas, also looks at green focused kitchen and bath issues, but look beyond that post, and you will be enlightened in a green way.

Peggy Deras, CKD, from Kitchen-exchange, has a great post on a free service for lighting questions. Let me tell you, planning lighting for any room in your home SHOULD be given first rate attention. It's a small price to pay (in this case none) to get it right the first time and to "see" clearly what you need and want to see!

Ann Porter, CKD, of Kitchann Style has a very interesting post on opening up, or visually enlarging small kitchens. Now, the conventional wisdom says that one must pack in as much storage as is possible in a small kitchen. As Ann says, it's more about finding alternative storage solutions, with the benefit of a much more spacious look to an otherwise small feeling kitchen. I like this way of thinking!

Laurie Burke, from Kitchen Design Notes, talks about the maintenance of soapstone.  Soapstone is a quite misunderstood material. No need to be freaked out by scratches...with a little elbow grease, your countertop is brought back to life and lustre. Explore, there is more on soapstone in the blog.

And for pure style, one of my fave design blogs, Desire to Inspire always manages to sneak in some great kitchens in their posts, which are a joy to see, especially in the context of the whole house, apartment, or whatever the environment! Take a look and get, well, inspired...